Although the recommended methods of export are full export and delta export of an application (see Exporting an application), partial export of one or more objects is also available if necessary. To preserve the integrity of your applications, however, partial export is not recommended.
- From the Welcome window, click on Applications —> Applications
- Displaying the Object Index: If the Object Index window is not
already displayed, click Options —> Object
Index from the Applications window.
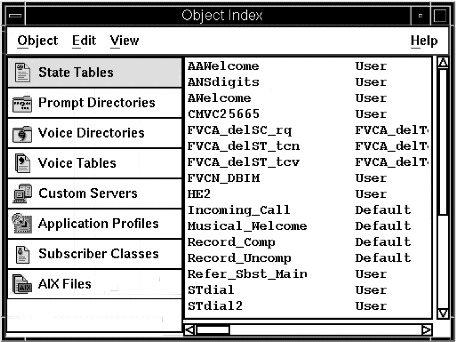
The Object Index window shows a folder for each type of object in the system:

The Object Index shows you all the application-related objects in the system, organized into folders. It’s another view of the objects in the system, each of which is contained in a single application. In other words, you cannot move objects out of the Object Index into an application: all objects are shown in the Object Index.
- Opening a folder: Single-click on the folder icon to open it.
The folder contains all the objects of that type in the system.
- Selecting the objects to export: Click one or more objects in the Object Index window.
- Click Object —> Export —> Partial.
The system displays the Partial Export window.
This window allows you to drag in any objects from any applications.
- To remove an object from the list, click it and then click Removefrom the popup menu.
- To add all the objects that are used by an object in the list, click the object and then click Get Dependencies from the popup menu. For guidance, see Choosing objects to export.
- To add an object from another application to the list, open the other application. Then click the object in the Application window and drag it into the Partial Export window.
- Exporting binary objects only: Click the appropriate radio button for Text and Binary (executable) objects, or Binary only. For guidance, see Exporting.
- Specifying where to put the export file: Click the appropriate
radio button for media type.
If you click File, the system displays the Export File window.
- Click the directory and click or type in the file name for the export file.
- Click OK.
The “working” dialog is displayed. The progress of the export is displayed on the status line in the Applications window. Once the export is completed, the system displays the Export Report window, giving details of what was exported.
To keep a record of the export, click Print or Save. When you click Print, the report is printed on the printer specified by the Printer Queue system parameter in the Blueworx Voice Response parameter group.
When you click Save, the system displays the Save Report window.
- Click the directory and select or type in the file name for the export file.
- Click OK.
Next Step
The export file is now ready to be transported to another system. Use whichever method you normally use for this (for example, file transfer protocol (ftp)).