Before you begin recording voice segments, read the following information for an explanation of the attributes that you will define for your audio data.
- To define sound levels, you can vary the dither before and during recording and playback. You can also adjust the volume for playback. Dithering, which is useful for high-quality 8-bit linear recordings, inserts a small amount of random noise into the signal. The additional background noise causes small signals to fade smoothly, which improves sound quality. There is no “correct” dither setting; a recommended level is 33%.
- The data format, sampling rate (the rate at which audio data is
examined), and sample width (the number of bits in each sample) of
the audio data you record are determined by the device you use for
recording. The default format, μ-law or A-law,
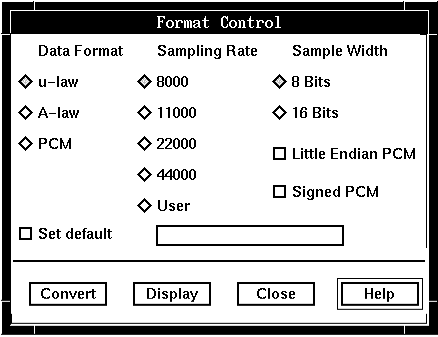
is defined in the system parameters. The Format Control window initially
displays the system default settings. Valid settings are:
- Valid data formats are μ-law (for T1), A-law (for E1), and PCM (Pulse Code Modulation).
- Valid sampling rates are 8 000 Hz, 11 000 Hz, 22 000 Hz, or 44 000 Hz. The telephone line playback rate is 8 000 Hz.
- Valid sample widths are 8 bits for μ-law, A-law, and PCM, and 16 bits for PCM only.
You can alter the format setting as required to define how Blueworx Voice Response interprets the recorded data. Blueworx Voice Response can convert from one format to another to allow you to transport your recordings between different devices. During conversion, relative volume is preserved. If the source format has a larger volume range than the destination format, be aware that conversion can result in a loss of sound quality.
Note: Before starting to rerecord an existing voice segment, make sure that there is no possibility of the voice segment being played at the same time. That means making sure that no application that uses the voice segment is running, and that no such application will be run when a call comes in.
To record voice segments using a microphone:
- From the Welcome window, click on Applications —> Voice Segments.
- Select language and voice directory: In the Voice Segments window, select the language and voice directory to contain the voice segments you want to record.
- Create new segment or open existing voice segment: To create a new voice segment, click Segment —> New. Follow the instructions in Defining a voice segment to provide an ID and save the segment description.
- Open the new or existing segment that
you want to record into.
The system displays the Voice Segment window for the selected segment.
- Define format attributes: To display the
Format Control window for defining the format attributes to be applied
to the audio recordings, click Options —> Format Control.
The system displays the Format Control window, with default format (μ-law or A-law) defined in the system parameters.

- Arrange windows: Move the windows displayed on your screen so that the Voice Segment, and Format Control windows are all fully visible.
- Adjust dither and check format: The
required Data Format, Sampling
Rate, and Sample Width is
set, as selected in step 5.
If you are adding to an existing voice segment, the default values displayed show the settings for the existing voice segment. To make sure that the data you record is compatible with the existing voice segment, do not alter the sampling rate and data format. Refer to Steps 11 and 13 for instructions about respecifying and converting the format of voice segments.
- Check microphone or input device: Make sure that your microphone
or input device is attached and ready, then select the Record (REC)
button to begin recording.
The status window displays the current settings and the operating status of the audio adapter (loading, recording, playing, or ready).
- Pause recording: Click the Pause (PAUSE)
button to temporarily stop recording; select Pause again to resume
recording.
The system records the audio input.
- Stop Recording: To stop recording, click the Stop (STOP)
button.
The recorded voice segment is displayed in the Voice Segment window. If you are adding to an existing voice segment, the new recording is appended to the selected portion of the existing voice segment. If no portion is selected, the new recording is inserted before the beginning of the existing voice segment.
- Change format: If you want to respecify the
format for the recorded audio data, use the Format Control window
to modify the format settings, then click Display. Note: The Format Control window defines only how Blueworx Voice Response interprets the audio data; the physical format of the data itself is unchanged. If you want to convert the actual format of the data, click Convert. Click Set default to use the settings from Convert or Display as the default the next time you open a New Voice Segment window.
The voice segment representation changes accordingly.
- Editing a voice segment: If you need to edit the segment, refer to Editing voice segments for instructions.
- Check formats: If you changed the default
format settings, you need to convert the voice segment to a valid Blueworx Voice Response format
before saving:
- In the Format Control window, select a data format of μ-law or A-law, a sampling rate of 8000, and sample width specification of 8 bits.
- Click Convert.
The voice segment is converted to the specified format.
- Saving the segment : From the Voice Segment window, Save the
voice segment. To change any information you specified when you defined
the segment (or to copy the current segment to a new segment), click Save
As to change the voice directory, language, segment
ID, or compression information for the voice segment.
The system saves the segment in the selected voice directory.
- Close the Voice Segment window.
- More?: Repeat this procedure, starting with Step 3, for the next voice segment you need to record.