Use this procedure to define the default prompts in a specified prompt directory:
- From the Welcome window, click on Applications —> Prompts.
- Select prompt directory: Select the prompt directory for the new prompts.
- Create new prompt: Click Prompt —>
New.
The system displays the Prompt window, showing the selected prompt directory and default values.
- Add prompt statements manually, by importing them, or
using statements: Add the prompt statements that define the prompt in
one of the following ways:
- Add the prompt statements manually.
- Click Utilities —> Import to import prompt statements (in ASCII format) from a file in the AIX file system to Blueworx Voice Response. See Importing prompts for instructions.
- Select the required prompt statements from the Statements menu. The prompt statements are described in Prompt statements. This is an example of the window you get when you select from the Statements menu:
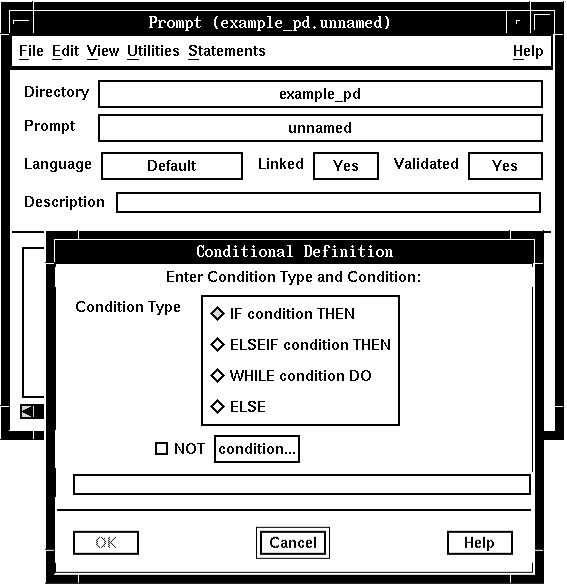
To insert a new statement at a selected position, move the cursor to the statement that will precede the added statement. To insert a statement as the first entry in the prompt, move the cursor to the left of the first statement and press <Enter> to open a new line.
- File and validate the prompt: Click
the File menu to Validate the prompt. If you are creating
several prompts in the same directory, you can validate them all at once;
see step 10.
If the prompt syntax is valid, the Validated field displays Yes. An application that includes this prompt will not execute unless this field displays Yes.
If all references to voice tables, voice directories, and prompts are valid, the Linked field displays Yes. An application that includes this prompt will execute whether or not this field displays Yes.
- Correct errors and save the prompt: After you have
corrected any errors, Save the new prompt. The system displays the
Prompt Information window:
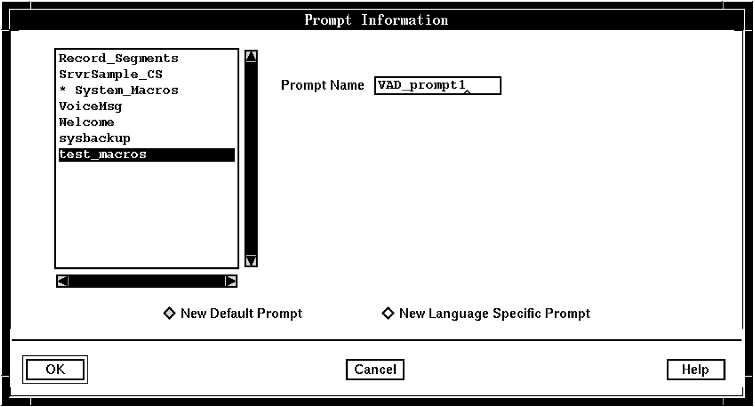
- In the Prompt Information Window:
- Click New Default Prompt.
- Select the required directory.
- Type a name for the prompt in the Prompt Name field.
- Click OK.
The prompt is saved and the window title shows the prompt directory and name. The Language field displays Default to indicate that this is the default language-independent version of the prompt.
- Close the Prompt window.
- More?: Repeat this procedure, starting with Step 3, for each prompt to be included in the selected directory.
- Validate all prompts in a directory: Click Directory —> Validate to validate the prompt directory that
contains all the prompts you have created.
The system displays the Prompt Directory Validation Results window, showing the results of the validation check.
This is a quick way to validate all the prompts in a directory. You do not need to do this if you validated each prompt as you defined it (in step 5).