How to install the TR1034 card.
Before you begin: Before
installing the TR1034 card into a pSeries computer, the TR1034 card
firmware must be at version 1.4.1B9. If the firmware is not at this
level, you must flash the firmware to version 1.4.1B9. To do this,
install the TR1034 card into a PC running Windows XP, and use the
Brooktrout utilities to update the firmware as described in the “Flashing
ROM and Downloading Firmware” chapter of the TR1000 Series Software
Installation, Configuration, and User's Guide.
- Turn off the computer.
- Remove the bracket from a vacant PCI slot.
- Insert the TR1034 firmly into the slot while holding the card at each top corner.
- Screw the TR1034 card's mounting bracket to the computer's frame
- Connect the H100 interface
- Turn on the computer.
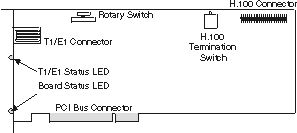
Figure 1. Layout of the TR1034 Card


For further information on card settings see Brooktrout Technology: Installing the TR1034 Digital PCI Board.
Warning
Electrostatic Discharge (ESD) can cause immediate or latent damage to Integrated Circuits. In order to minimize ESD you should wear an antistatic wrist strap whose lead has been clipped onto the metal chassis of the computer or, at the very least, touch the computer's chassis before you handle the fax card, in order to discharge any static electricity you may be carrying.