This section tells you how to configure Blueworx Voice Response for Voice over IP.
- To configure Blueworx Voice Response for
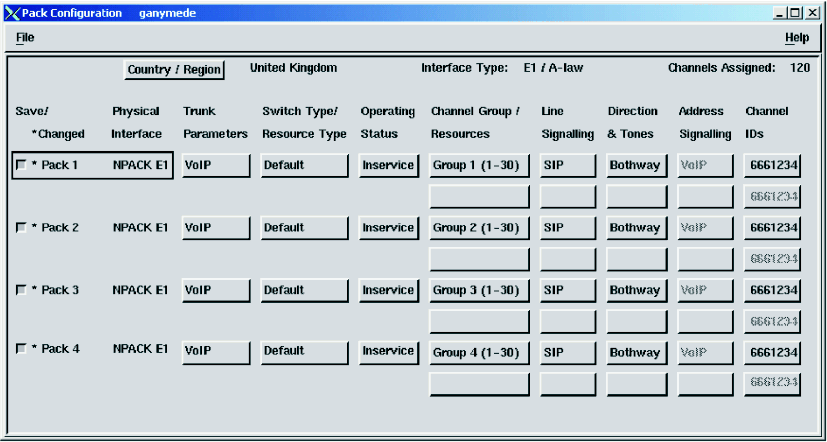
Voice over IP, select Configuration → Pack Configuration → Change from
the Blueworx Voice Response welcome
window to display the Pack Configuration window: Figure 1. Pack Configuration window for DTNA configuration showing NPACKS
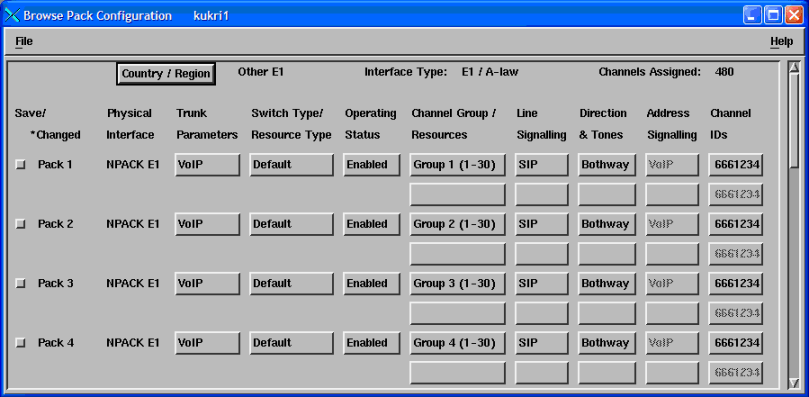
Each pack has a corresponding Trunk Parameters button. To configure VoIP settings for an NPACK (for example, Pack 1), select this button for pack 1.
Note: The pack type shown in the Pack Configuration and System Monitor windows is:- NPACK for DTNA
- For an NPACK, a Trunk Interface Parameters window
similar to the following is displayed: Figure 2. Trunk Interface Parameters window for DTNA configuration
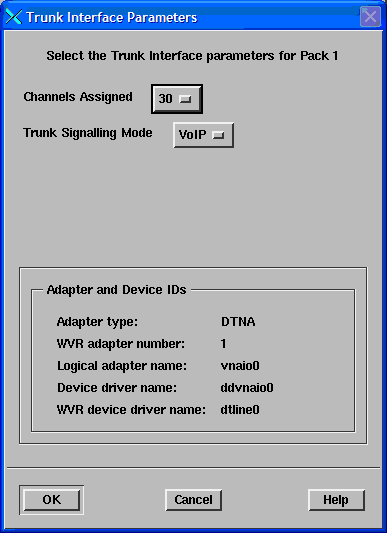
- Click the drop-down button labeled Channels Assigned and select from it the number of channels that you want to assign to this trunk. Remember that your license allows you to use no more than a specified number of channels.
- The Trunk Signaling Mode button will be set to VoIP.
- Click OK.
- The Trunk Interface Parameters window closes and you are returned to the Pack Configuration window.
- The Operating
Status determines the state in which the Blueworx Voice Response Voice
Over IP interface is placed whenever Blueworx Voice Response is
started. To change the operating status, click the Operating
Status button.
The operating status selection window opens.
- Click the required operating status. Possible values are:
- Inservice
- The required microcode is loaded and diagnostics are run and the system is ready to process calls. The channels are set to Inservice: ready to make or receive calls. This is the normal setting when you are using the system in production.
- Enabled
- The required microcode is loaded and diagnostics are run. Although the pack shows as In Service, it cannot be used until you put the relevant channels In Service (Operations → System Monitor).
- Available
- The DTNA digital trunk adapter is present but is not ready to communicate with the network. The system is not ready to process calls until you enable the pack and set the channels In Service (Operations → System Monitor). The relevant pack can be configured (using the buttons to the right of this one), but the required microcode is not loaded.
- Defined
- The pack and the associated configuration options are fully disabled. Defined is a place holder until the DTNA digital trunk adapter is physically installed in the pSeries computer.
- Click OK to confirm your update.
The Operating Status button displays your selection.
- Use the Channel Group buttons to set up any channel groups you require. For more information on channel groups, see Blueworx Voice Response for AIX: Configuring the System.
- Click on the Line Signaling button
for the first pack.
The Line Signaling window opens.
Figure 3. Line Signaling window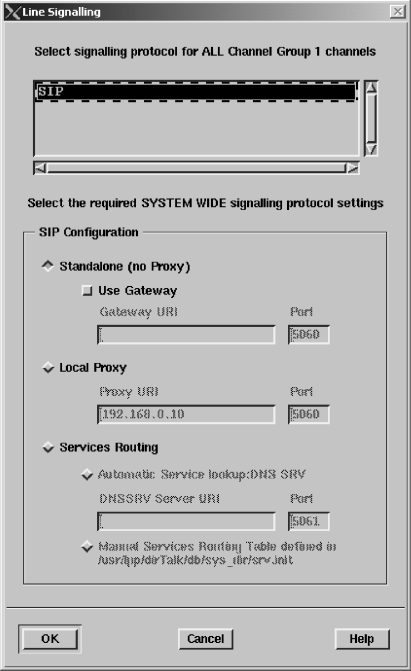
- Select the SIP signaling protocol.
- If
you are not working with a SIP proxy server, select Standalone
(no Proxy).
- If you are using a gateway, select Standalone (no Proxy) and Use Gateway, and enter the URI of the gateway.
- If you are working with a SIP proxy server with a known fixed IP address, select Local proxy and enter the IP address and port number of the SIP proxy server.
- Populate the DNS SRV file.
If you are working with manual services routing, select the Services Routing option then select Manual Services Routing Table defined in /usr/lpp/dirTalk/db/sys_dir/srv.init (where an example srv.init file can be found). This option allows SRV request records to be manually entered into the srv.init file. The information in this file will then be used for routing by SIP signaling.
If the request records contain weights and priorities, scheduling of services is maintained according to RFC 2782.
The srv.init file can be configured dynamically whilst VoIP is running. Any changes made will be reflected within approximately 60 seconds of the file being saved.
Note: The Automatic Service Lookup:DNS SRV option is not currently supported.
- If
you are not working with a SIP proxy server, select Standalone
(no Proxy).
- Click OK.
- To set the call direction, select the Direction & Tones button for the relevant pack. The Call Direction window will show the settings of the channel groups. To change a channel group's call direction, click the appropriate button.
- To change the default caller ID, click the Channel
IDs button for the relevant pack. The Channel Identification window
opens. Figure 4. Channel Identification windowThe number that you type in the Telephone number field is the number of the default application that you want to use for all VoIP calls when an application profile ID cannot be determined from the incoming message. This number will be stored in the Default Caller ID (CLID) field (in System Configuration → Browse → VoIP SIP Signalling → Default CLID for Incoming VoIP Calls).
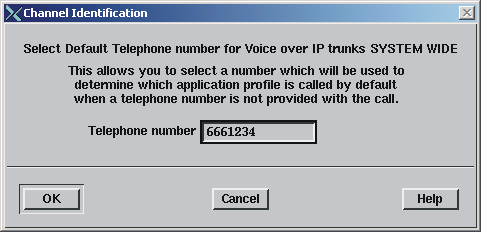
You can only have one default VoIP application profile, and this will apply for all VoIP channels. If a system also has DTTA adapters, the channel IDs that are set for these are independent from those set for VoIP.
- Repeat steps 1 to 15 for each pack you want to configure.
- An asterisk (*) will be displayed next to the pack identifier
for the packs you have configured. Select the Save checkbox
next to each asterisk. Figure 5. Pack Configuration window for DTNA configuration
- Select File → Save.
- Select File → Close.
Your configuration changes will take effect when you shut down and restart Blueworx Voice Response. See Shutting down and restarting Blueworx Voice Response for instructions.