Use this procedure to create a distribution list for a mailbox. This procedure assumes that you have already created an application profile that includes mailbox definitions and saved the profile. However, you can combine this procedure with the procedures in Creating an application profile and Creating mailboxes for application use and create a distribution list for each mailbox after you define the mailbox and save the definition.
Each distribution list is identified by a four-digit number. The number can be any combination of the digits 0 through 9.
A distribution list can be public or private. A private distribution list is reserved for the use of the mailbox owner. A public list can be used by anyone. However, only the person who created the public list can modify it.
The system limits the number of distribution lists to 90 per mailbox. There is no limit to the number of members on each distribution list. However, if the application profile is assigned to a subscriber class, the limitations defined by the subscriber class may apply. (For more information on subscriber classes, see What are subscriber classes?.)
To create a distribution list for a mailbox:
- From the Welcome window, click on Configuration —> Application Profiles
- Selecting the mailbox : Open the application
profile that defines the mailbox.
The system displays the profile information in the Application Profile window.
- Click Options —> Distribution List.
The system displays the Distribution List window.
- Select the button to the left of the number that identifies the mailbox for which you are creating the list.
- Naming the list : Click Add New List.
The system prompts you for a list ID.
- Type in the 4-digit list ID.
- Click OK.
The system displays the list ID under the label Distribution List.
- Click the list ID.
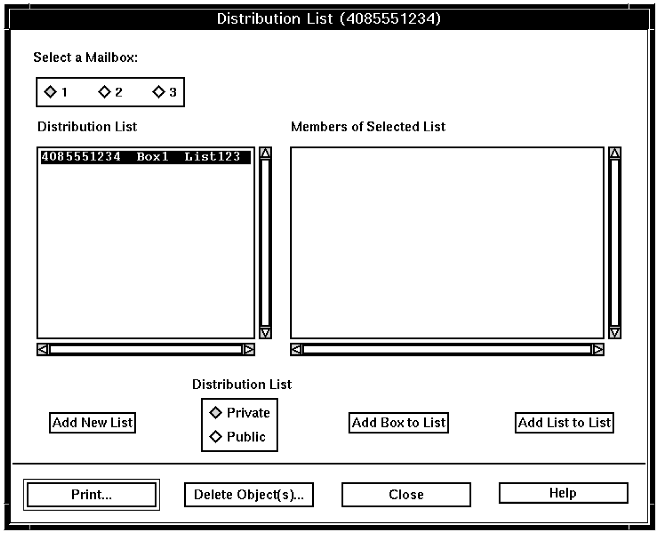
- Classifying the list : Click the button next to Private or Public.
- Adding a mailbox to the list : To add
a mailbox to the list, click Add Box to List.
The system displays a list of application profiles.
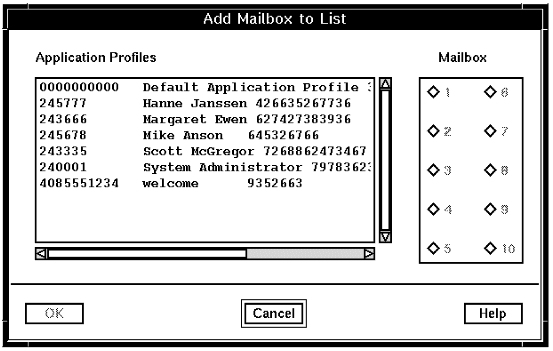
- Click the application profile that you want to add to the distribution list.
- Click the button next to the mailbox that you want to put on the distribution list.
- Click OK.
The system adds the mailbox to the distribution list and displays it as a member.
- To add more mailboxes, repeat steps 10 through 13.
- Adding a distribution list to the list: To add a distribution list to the list, click Add List to List.
The system displays the Add List to List window with a list of Application Profiles on the left.
- Click the application profile and then click a Mailbox.
The system displays all the distribution lists that belong to the selected mailbox:
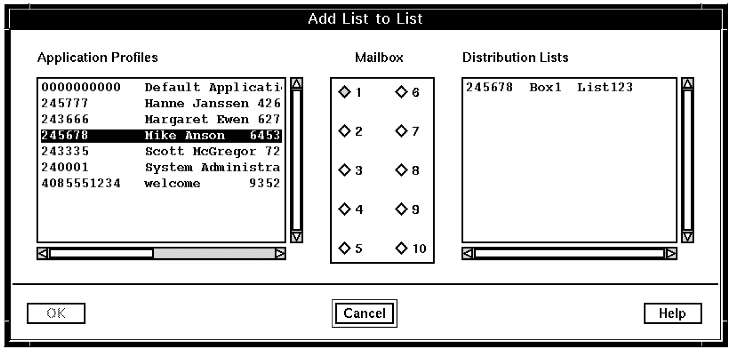
- Click the distribution list that you want to add to the current distribution list.
- Click OK.
The system adds the distribution list as a member of the current distribution list.
- To add more distribution lists, repeat steps 15 through 18.
- When you are finished, click Close.
The system displays the Application Profile window.
- Save the application profile. Even though the Application Profile window is still displayed, the system has created the distribution list for the mailbox and saved it.