This section describes the State Table window and how to use it to define actions and states.
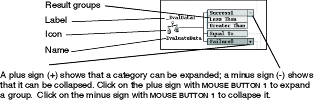
This figure illustrates how a plus sign and a minus sign can be used to expand and collapse a category, respectively.

To create a new state, drag the appropriate action from the Action Palette, using mouse button 1, and drop it into position on the canvas. You can create several states at a time, or one after the other, before filling in any of the details or connecting the states together.
The possible results of the action are grouped into categories such as Failure and Success.
Filling in the details
You can:
- Double-click on the state icon with mouse button 1.
- Select the state, click on it with mouse button 3 to display the State popup menu, then click Open.
The system displays the details window for the state. For more information about the window, refer to the online help for the window, or to the information in the Blueworx Voice Response for AIX: Application Development using State Tables.
Connecting the states
Each of the possible results of a state needs to be connected to the next appropriate state. For example, a Caller Hung Up result could be connected to a CloseEverything state. To connect one or more results to a state, you can:
- Click on the results or result groups with mouse button 1. Position the mouse pointer over the destination state. The mouse pointer
changes to the connection pointer. Click on the destination state. The system
displays a line, showing the connection, and the mouse pointer changes back
to an arrow.
To select results, you can either click on a single result or result group with mouse button 1, or drag mouse button 1 to select adjacent results. Ctrl-click mouse button 1 to add non-adjacent results to the selection.
- Click Utilities —> Labels to display the Labels window. The window lists the labels for all of the states in the state table. Open the details window for the state whose results you want to work with. The window contains text fields for each of the results of that state. Select the text field for the result you want, select the appropriate label from the Labels window, then click the Select push button. Click OK in the Action window.
Finding the state to which a result is connected: Select the result and click with mouse button 3 to display the Result popup menu, then click Go to Destination. The destination state is selected.
Finding the states connected by a line: Select the line and click with mouse button 3 to display the Line popup menu. To find the destination of the line, click Go to Destination. To find the source of the line, click Go to Source.
Reducing line clutter manually: To reduce the number of lines on your canvas, you can convert lines into a stub. You can:
- Select the lines and click with mouse button 3 to display the Line popup menu, then click Stub.
- Select the lines, then click Edit —> Make Stub.
- Select the source results and click with mouse button 3 to display the Result popup menu, then click Stub Results.
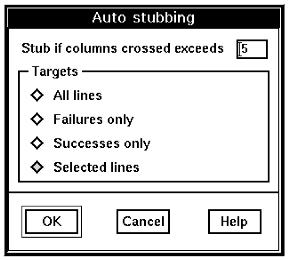
Reducing line clutter automatically: You can automatically convert lines into stubs whenever they become too long. Click Utilities —> Autostubbing. The system displays the Autostubbing window:

Type the maximum number of columns you want your lines to cross in the Stub if columns crossed exceeds field. Lines which cross a larger number of columns will be converted to a stub. Select a radio button for the type of line, then press Enter. The lines that meet your criteria are now displayed as stubs.
Rerouting lines: When you add and remove states in a state table, the lines might no longer take the shortest route between two states. To redraw the lines in a table so that they take the most efficient routes, click View —> Reroute Lines.
Sometimes, if you have a large number of states and connections, lines might be displayed directly on top of one another, even after they have been redrawn. In that case, move an icon to which one of the lines is connected.
Deleting a connection
You can:
- Select the line and click with mouse button 3 to display the Line popup menu. Click Disconnect.
- Select the text field for the result in the state details window and press Backspace or Delete.
Copying a state
You can:
- Drag and drop the state using mouse button 2.
- Select the state and click with mouse button 3 to display the State popup menu. Click Copy. Click with mouse button 3 on the canvas and select Paste.
Moving a state
You can:
- Drag and drop the state using mouse button 1.
- Select the state and click with mouse button 3 to display the State popup menu. Click Cut. Click with mouse button 3 on the canvas or Action Palette and click Paste.
Deleting a state
You can:
- Select the state, then click Edit —> Delete.
- Select the state and click with mouse button 3 to display the State popup menu. Click Delete.
Using list view
You can perform all of the same tasks in list view as you can in icon view. For example, you can still create new states by dragging actions from the Action Palette, and open the details window for a state by double-clicking on the state name.
To connect states in list view, click Utilities —> Labels to display the Labels window. The window lists the labels for all of the states in the state table. Open the details window for the state whose results you want to work with. The window contains text fields for each of the results of that state. Select the text field for the result you want, select the appropriate label from the Labels window, then click the Select push button.
Saving your settings
Both the Applications window and the State Table window automatically save the settings you last selected (whether you selected list view or icon view, for example, or whether you displayed the toolbar). The same settings will be used when you next open the window, even if you are working with a different state table.