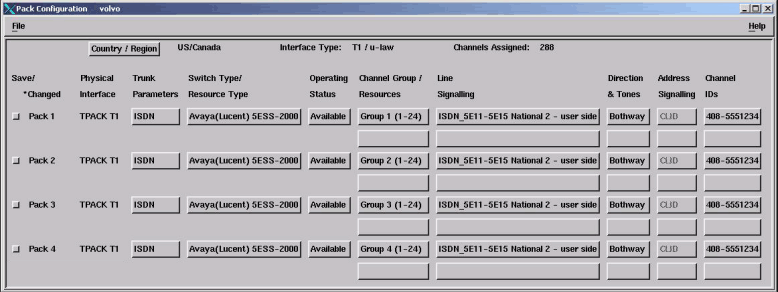
- From the Welcome window, select Configuration —>
Pack Configuration —> Change
- Setting the country or region: The country or region for which Blueworx Voice Response is currently
configured is shown to the right of the Country or Region button
at the top of the window. If the country or region is not correct,
click this button.
The country or region selection window is displayed:
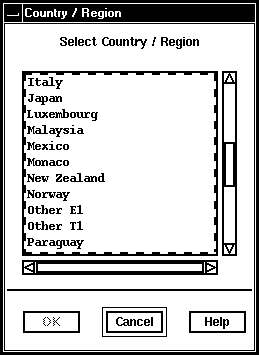
- Click the required country or region, then OK to
verify your selection.
The selected country or region is displayed at the top of the Pack Configuration window. If the name of your country or region is not there, select Other (E1) or Other (T1).
- Assigning channels and setting
the signaling mode: The Trunk Parameters buttons
show the type of signaling protocol for each pack. To change the type
of signaling protocol for a pack, click the related button.
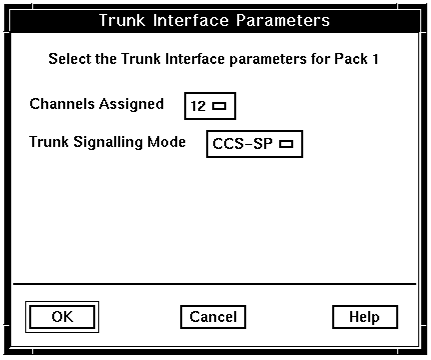
The Trunk Interface Parameters window is displayed:
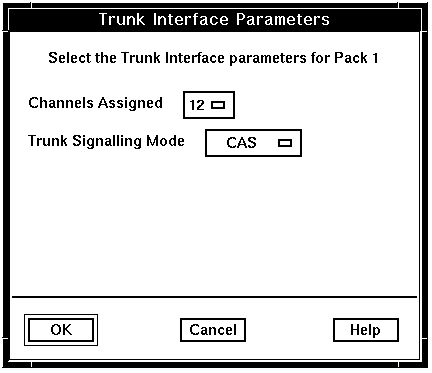
- Click the drop-down button labeled Channels Assigned and select from it the number of channels that you want to assign to this trunk. Remember that your license allows you to use no more than a specified number of channels.
- Click
the drop-down button labeled Trunk Signaling Mode and
select from it the correct signaling protocol.
If you select ISDN on an E1 system, the CAS button is replaced by ISDN. On a T1 system, the NFAS parameters are displayed. For more information about NFAS, see the Blueworx Voice Response for AIX: General Information and Planning information.
If you are planning to use NFAS:
- Select the checkbox labeled Non Facility
Associated Signaling (NFAS) support
The NFAS parameters are activated:
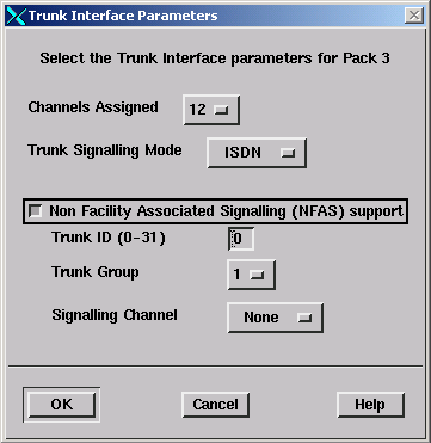
- In the Trunk ID field, type in the trunk identifier that your network provider has allocated. The trunk identifier must be different for each NFAS trunk within a trunk group.
- Click the Trunk Group drop-down button and select an NFAS group (1, 2, 3 or 4). The trunk is allocated to the group you select. You can have a maximum of 10 trunks in a group and a maximum of four groups.
- Click the drop-down button labeled Signaling Channel.
Select Primary if this trunk will be used to carry the signaling
information or Backup if it will be used to carry signaling
information if the primary trunk is out of service. Select None if
this trunk will be used to carry voice only.
If you are using a common channel signaling protocol other than ISDN, including Blueworx Voice Response's SS7 support, click CCS-SP. (The SP refers to a custom-written signaling process, which you will specify in the Line Signaling window.)
- Select the checkbox labeled Non Facility
Associated Signaling (NFAS) support
- Click OK to confirm your selection.
If you have increased the number of configured channels, Blueworx Voice Response displays a Confirm Request window:
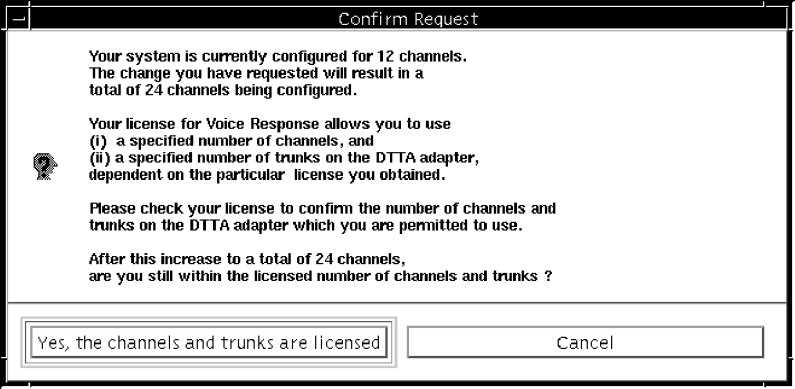
Note: If you have increased the number of configured channels on a DTTA, the window also prompts you to check the number of trunks allowed on your DTTA license. - When you have checked your license and are sure that it allows you to use the total you have requested, click Yes, these channels are licensed.
- If you cannot check your license, or find that it does not allow you to use the total you have requested, click Cancel. Check whether all your licenses have been properly enrolled and distributed. See the Blueworx Voice Response for AIX: Installation information for instructions. You might need to contact your Blueworx Representative and order more channels or, if possible, decrease the number of channels on another trunk, and then assign them to this trunk.
- Setting
the switch type: The Switch Type buttons
show the type of switch to which the pack is connected. If the button
shows the wrong type of switch, and the button is enabled, click it.
The Switch Type window is displayed. (The list of switch types is determined by your choice of Trunk Signaling Mode in the Trunk Interface Parameters window.)
Note: If you are using FXS with the Nortel DMS100 switch, click Channel Bank.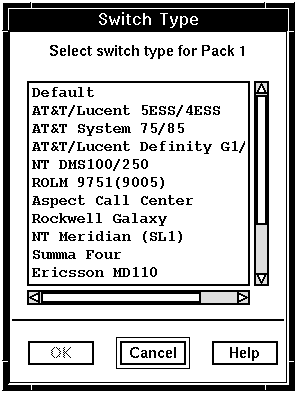
- Click the required type, then OK to
confirm your selection. Your choice of switch type controls the choices
you are offered when you select other buttons on the Pack Configuration
window. Switch type is not used by the Blueworx Voice Response system.
If your switch type is not listed, click Default.
The button is reset to the required switch type.
- Setting
the initial operating status of the pack: The Operating
Status determines the state into which the pack is placed
whenever Blueworx Voice Response is
started. To change the operating status, click the Operating
Status button.
The operating status selection window is displayed:
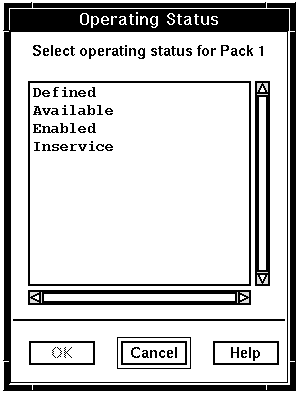
- Click the required operating status. Possible values are:
- Inservice
- The required microcode is loaded and diagnostics are run (this takes about a minute) and the pack is ready to process calls. The channels are set to Inservice; ready to make or receive calls. Inservice is the normal setting when you are using the system in production.
- Enabled
- The required microcode is loaded and diagnostics are run. Although the pack shows as In Service, it cannot be used until you put the relevant channels In Service (Operations —> System Monitor).
- Available
- The digital trunk adapter is present but is not ready to communicate with the trunk. The trunk is not ready to process calls until you enable the pack and set the channels In Service (Operations —> System Monitor). You can configure the relevant pack by using the buttons to the right of this one. The required microcode, however, is not loaded.
- Defined
- The pack and the associated configuration options are fully disabled. Defined is a place holder until the digital trunk adapter is physically installed in the pSeries computer.
- Click OK to confirm your update.
The Operating Status button displays your selection.
- Allocating channels to channel groups: The two Channel
Group buttons for each pack show which of the 24 T1
or 30 E1 channels on the trunk are allocated to which channel groups.
If, for example, a channel group button displays Group 4 (1-10), this means that channels 1 to 10 have been allocated to channel group 4.
Two Channel Group buttons are provided so that you can allocate some channels to one channel group and some to another. You might want to do this if some channels are to be used exclusively for incoming calls and some exclusively for outgoing calls. For further information on Channel Groups, see Supporting one or more protocols and Planning channel groups.
Note: If you want to divide the channels on one trunk to more than two channel groups, you must complete the definition of the two groups you have now started on, save the configuration, close the Pack Configuration window, and then open it again. You can then define the characteristics of two more channel groups on this trunk.To change the existing allocation of channels to channel groups, click either of the Channel Group buttons. (The buttons are grayed out if the operating status is set to Defined.)
The Channel Group Selection window is displayed, showing both channel groups:
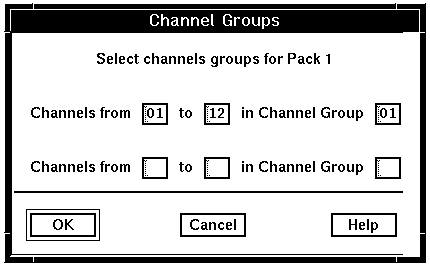
- Enter or update channel allocations as required:
- To allocate all the channels on a trunk to one channel group, enter the lowest and highest channel numbers, and the required channel group number, on a single line. Leave the other line blank by deleting any data shown.
- To allocate some channels to one group and some to another, ensure that the two ranges of channels do not overlap. For example, allocate channels 1 through 12 to one group and 13 through 24 to the other.
- Click OK to confirm the update.
You are returned to the main Pack Configuration window. Your new channel assignments are now shown on the Channel Group buttons.
- Setting the signaling protocol: The signaling
protocol that is to be used
by the range of channels displayed on the upper Channel
Group button is shown on the upper Line
Signaling button. The signaling protocol that is to
be used by the range of channels displayed on the lower Channel
Group button is shown on the lower Line
Signaling button. Note: Changing the signaling protocol affects every channel that is allocated to this channel group, including those on other trunks.
To change the protocol, click the appropriate Line Signaling button.
The signaling protocol selection window is displayed. (The list of protocols is determined by your choice of Trunk Signaling Mode and Switch Type and is automatically limited to those supported by your telephony hardware.)
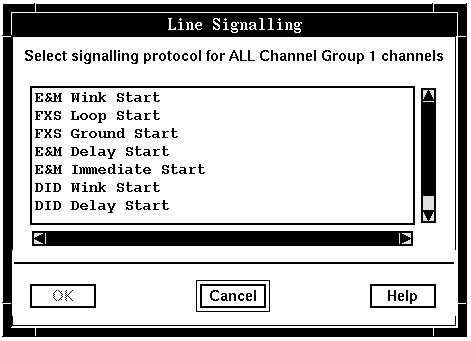
- Click the protocol that you intend to use. If you have selected CCS-SP as the Trunk Signaling Mode, this window displays CCS protocols that are supported by Blueworx Voice Response , for example SS7_ISUP, and the names User1 through User19. Click the name of the signaling process that you intend to use.
- Click OK to confirm your selection.
You are returned to the main Pack Configuration window; the Line Signaling button is reset to the required signaling protocol.
- Setting call direction: The Direction &
Tones buttons show the direction settings of the two
channel groups. To change the channel group's call direction, click
the appropriate button.
The Call Direction window is displayed:
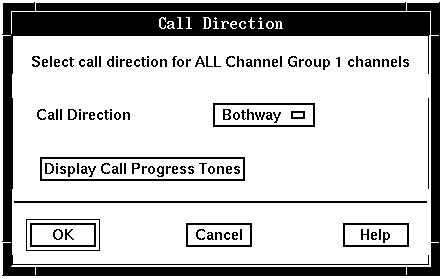
- CAS only: The Direction button
determines whether Blueworx Voice Response can both
make and receive calls. Possible values are:
- Outgoing: Blueworx Voice Response can make calls but does not answer incoming calls.
- Incoming: Blueworx Voice Response can only receive calls; it cannot make them.
- Bothway: No restriction has been put on this channel group.
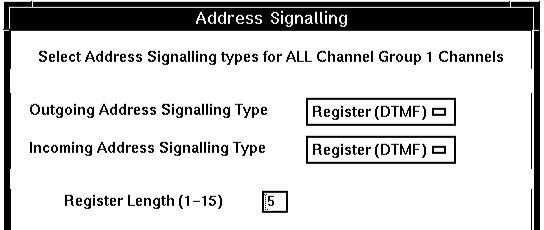
- Setting address signaling parameters: For
channel associated signaling, the Address Signaling buttons
show the type of incoming address signaling for the two channel groups.
To change the channel group's address signaling, click the related
button. Note: A change in the address signaling parameters affects every channel in this channel group, including those on other trunks.
The Address Signaling window is displayed:
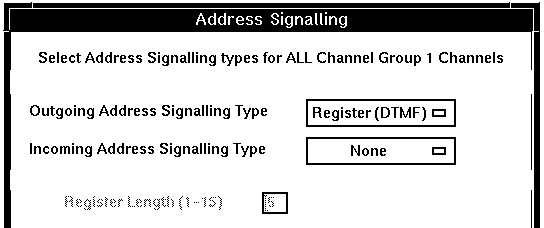
- Outgoing Address Signaling: The Outgoing
Address Signaling Type button shows the type
of in-band signaling that Blueworx Voice Response should
use when making an outgoing call.
Register signaling is supported by E&M and DID protocols. Click one of the following:
- Register (DTMF): DTMF signaling
- Register (MFR1): MFR1 signaling
- Register (Pulse): Pulse signaling
- Register (FGpD): Feature Group D with MFR1 signaling.
Click the button and drag the mouse pointer to the related value.
- Incoming Address Signaling : The Incoming
Address Signaling Type button shows the type
of in-band signaling that is to be used to identify incoming calls.
If your switch and protocol do not support incoming address signaling,
click None.
Register signaling is supported by E&M and DID T1 protocols and by R2, U.K. Tie, U.K. CallStream, and Italy E1 protocols. Click one of the following:
- Register (DTMF): Fixed length register with DTMF signaling
- Register (MFR1): Fixed length register with MFR1 signaling
- Register (Pulse): Fixed length register with pulse signaling
- Register (FGpD): Feature Group D with MFR1 signaling.
For the switch types with which you can use an exchange data link to handle the incoming address signaling, the following options are also offered:
- Sig Proc (ACL)
- Sig Proc (SMDI)
- Sig Proc (SMSI)
- Sig Proc (VMS).
If the type of exchange data link signaling process that you want to use is not listed, you must use System Configuration to specify it.
- If you choose Register (DTMF), Register
(MFR1), or Register (Pulse) for incoming address signaling,
you must specify the length of the register in the Register
Length field:
- If you choose one of the Sig Proc options,
you can then set the parameters for the exchange data link. Choose
the Data rate, Parity, Communication
port and Line ID that are
correct for your switch. Note: Parameters that are inappropriate for the Sig Proc are not available for selection.
- Stripping or padding numbers: If you selected an Incoming Address
Signaling Type option of SMSI, SMDI, or VMS, you can
choose to strip or pad the phone numbers as required by your switch, Blueworx Voice Response applications,
and the selected protocol. For more on using this process, see Exchange data link.
For SMSI/SMDI variable length phone numbers:
- To strip Called or Calling numbers:
- Enable the appropriate Strip option.
- Set the Minimum length for the number.
- Set the Character that is stripped from the numbers received from the switch.
- To pad MWI numbers:
- Enable the MWI Pad option.
- Set the Length of the number expected by the switch.
- Set the Character used to pad each number before it is sent to the switch.
For SMSI/SMDI fixed length phone numbers:
- Disable the Strip option. Blueworx Voice Response then uses each number as it is received directly from the switch.
For VMS variable length phone numbers:
- To strip Called or Calling numbers:
- Enable the appropriate Strip option.
- Set the Minimum length for the number.
- Set the Length of the number expected by the switch.
- Specify the Character that is stripped from the numbers received from the switch.
- To pad MWI numbers:
- Enable the MWI Pad option.
- Set the Minimum length for the number.
- Set the Character used to pad each number before it is sent to the switch.
For VMS fixed length phone numbers:
- Disable the Strip option. Enter the number of digits that make up the Called and Calling numbers in Length. Blueworx Voice Response returns an error if the numbers it receives is of any length other than the one specified by Length.
- To strip Called or Calling numbers:
- Click OK to complete the update.
You are returned to the main Pack Configuration window.
- Setting the telephone numbers: The Telephone
Numbers button displays the area code and telephone
numbers that are associated with the two channel groups. If different
channels are set to different numbers, the digits that are not common
to all channels are shown as Xs. The
Area code is the same for all channels in a group.
Whenever the called number is not available, he area code and telephone number values are used as channel identification, to find an application profile to answer a call. You specify a phone number (and, optionally, an area code) for each channel on your system: the phone number does not have to be unique for each channel. Then you must provide an application profile to match each number.
Note: If you are using a signaling process or exchange data link, the area code is used even when the called number is available: it is concatenated to the beginning of the called number. If you do not want this to happen, ensure that the Area Code field is blank.For more information, see Answering each call with an appropriate application and Channel identification.
This window also shows the line identifiers (Line IDs) that the exchange data link uses. For CallPath_SigProc, set each line ID to the station or phone number for the line; each of the line IDs must be unique.
To change the area code, telephone numbers, or the line IDs, click the appropriate Channel IDs button.
The Channel Identification window is displayed:
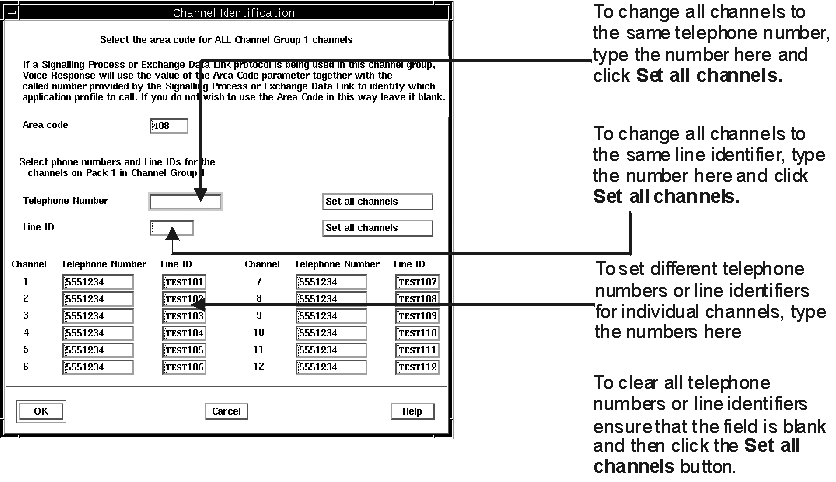
For information about how the area code and telephone numbers are used, see Channel identification. For information about message line identifiers, see Message Info Line Identifier.
- When you have set all the numbers and the area code
correctly, click OK to complete the update.
In the Pack Configuration window, the telephone number is displayed if it is the same for all channels. If different channels are set to different numbers, the digits that are not common to all channels are shown as Xs.
- Configuring other packs: If you have more than one pack installed in your system, repeat Steps 10 to 31 for each of the other packs.
- Saving your changes: An asterisk (*) is displayed next
to the pack identifier if you have changed the values of any of the
following:
- Trunk Parameters
- Switch Type/Resource Type
- Channel Group/Resources
- Line Signaling
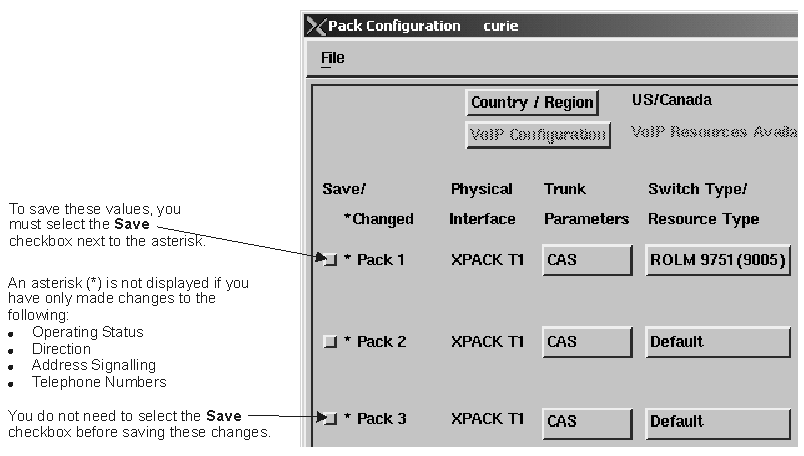
Attention: If you select the Save checkbox, other system parameter values might be reset to default values, undoing any work done using System Configuration.If you do not want this to happen, do not select the Save checkbox, even if you haven't made any changes.
- Click File —> Save.
In this example, all changes made to pack 1A are saved and many other system parameters are reset. For pack 1B, changes made to Operating Status, Direction, Address Signaling, and Telephone Numbers are saved but no other system parameters are reset.
- Click File —> Close.
You are returned to the Welcome window.
The new configuration for each pack takes effect when Blueworx Voice Response is next restarted.